

Newberry Art Tutorials
Charcoal Drawing Part 1 by Michael Newberry
Charcoal drawing is 30,000 years old and marks the dawn of humankind. When drawn on great paper is one of the easiest and most rewarding techniques in all visual art. It is perfect for the beginner because it quickly conveys the image; mistakes are easily corrected, and it naturally enhances light effects. It holds challenges to expert artists as well: it lends itself to the extremes of the freedom of action drawing or insanely subtle realism.

Materials
Rives BFK paper.
Kneaded eraser, Pink Pearl eraser. Optional, a drawing eraser.
Straight edge.
6 B charcoal pencils. Generals.
Flat compressed charcoal stick, soft. Alpha Color is a good brand.
Portfolio Cachet, 20 x 26 inches. It is lightweight and doubles as an excellent drawing board.
Metal Clips.
Shop Mechanics Paper Towels (hardware stores).
Sennelier charcoal or pastel fixative.
Glassine paper, to protect your finished drawing.
Exacto knife, for sharpening the charcoal pencil.
You need a great paper. Inferior papers simply cannot withstand repeated erasing; they lose the paper’s integrity and become resistant to edits after a couple of minutes. My favorite paper is Rives BFK, found in good art stores. It is 100% cotton rag, acid-free. It comes in white, off white, and in heavy to light sheets. I prefer medium. A heavy sheet is excellent if you want to work on your project for weeks or months. I tend to work about 10 to 20 hours on a finished charcoal.

Starting with an oversized sheet, about 40 x 29 inches, and I will trim it down to 19 x 26 inches. Here marking where it will be divided.


With a great paper like Rives, it is fine art practice to tear the sheet instead of cutting it with a blade or scissors. After I have marked the dimensions, I use a straight edge to make the tear—careful to keep pressure along the straight edge with my left hand as a tear with my right. Very easy, if done carefully.

Most quality papers have a watermark, which you can see when you hold them up to the light. The side where the watermark reads normally is the front, the side you want to draw on. Though, it is not the end of the world if you end up drawing on the back.

Place the paper on your portfolio/drawing board using metal clips. Then using the flat side of the compressed charcoal stick, I gently, very gently, spread an even layer of charcoal over the paper. The more gently you can do this now, works to your advantage later – because it will be easier to erase the highlights.
Note: You will notice that you will get impressions from the flat surface under the paper. You might want to place another piece of same size paper underneath your drawing paper for more even tone.


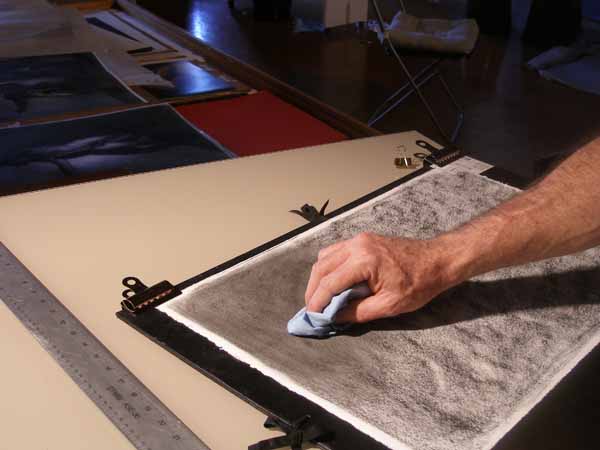
Using Shop Mechanics’ paper towels gently blend the charcoal to moderately smooth finish. A smooth finish now gives more kick and power to your shadows and highlights later.

The preparation takes about 10 to 15 minutes. Now you are ready to start drawing.
In Charcoal Drawing Part 2, I will show you the stages of blocking out the shadows to the finishing touches of wonderful highlights.

I hope you enjoyed seeing charcoal in a fresh way.
Michael Newberry
Santa Monica, April 2010
